So, this post finds me up in the Pacific Northwest, sharpening the saw at a travel conference called “TravelCon” in Portland. Attending this conference again here in 2024 seemed like a great way to kick of another travel project I am just getting started with called 50at60, a personal quest to visit all 50 states in one year, my 60th year here with you all! A great primer to get fueled up and excited about the world of travel and sharing my experiences as the year unfolds!
Well, ss luck would have it, I decided to come out here first to begin this quest of sorts, and start with Washington, Oregon, and Alaska (yes, I am heading to Alaska in a few days!) I say luck as the world experienced one the most amazing displays of light in many years just the other night, and I just happened to be here … with a clear sky!
Did you see it? If so, where were you?
I must admit though, as I arrived at Rialto Beach, and stumbled upon, over, and under all of the large driftwood logs (some almost 4′ in diameter!), my basic knowledge of photography got placed on the back burner as I bumbled about with cold fingers making adjustments on the cameras. Bad adjustment!
The excitement of the moment kind of took over as all memory and knowledge of the camera seemed to disappear right out of my brain! LOL.
One mistake to note for the record, I kinda pushed the limits of the Sony ISO settings. I mean REALLY pushed it.
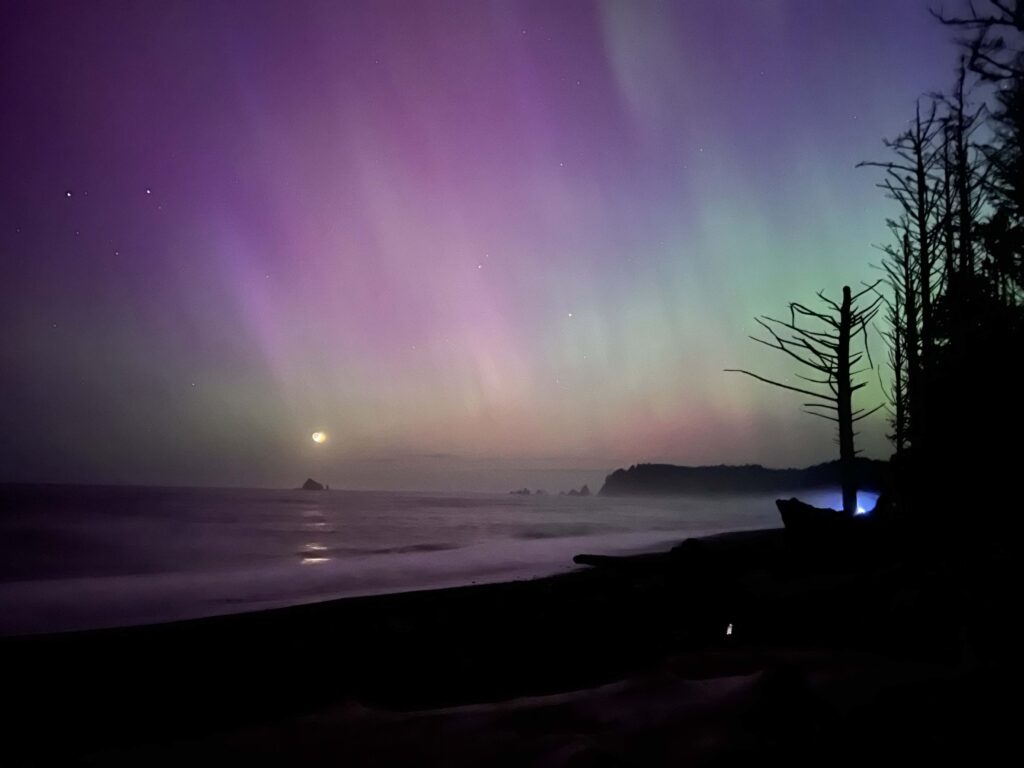
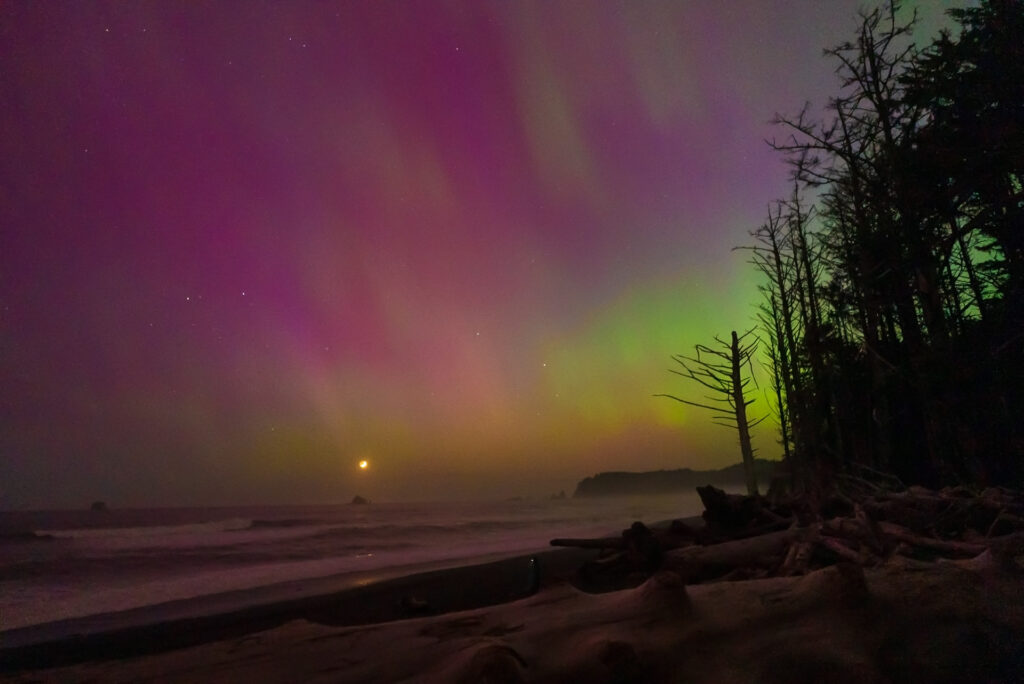
The images below, first an image right from the iPhone … NO PROCESSING AT ALL AND HANDHELD? How do they do that? The second one, from the Sony. A bit of basic processing in lightroom and some noise reduction work. Still need some refining, but you get the picture.
Lots more in a future post (after I figure out a way to clean the noisy images up a bit) as well as more to the story, but still … a memory of a lifetime!
So in case I get caught up in the excitement again next time the sky opens up, I figured I would leave myself a few reminders and bread crumbs here (thanks to some help from ChatGPT) and thought you might like the cheat sheet as well!
Enjoy and make sure and bookmark this for the next time! I know I will 🙂
Introduction
The Aurora Borealis, also known as the Northern Lights, is a mesmerizing natural phenomenon that paints the night sky with brilliant colors and dynamic patterns. Photographing this celestial display can be both challenging and rewarding, offering a unique opportunity to capture the beauty of the universe. In this blog post, we’ll guide you through the essential steps to successfully photograph the Aurora Borealis, from choosing the right gear to mastering the techniques.
Choosing the Right Gear
To capture the Northern Lights in all their glory, you’ll need to have the appropriate equipment. Here’s what you need:
- Camera: A DSLR or mirrorless camera with manual settings is ideal. Ensure it has good low-light performance.
- Lens: A wide-angle lens with a fast aperture (f/2.8 or lower) will help you capture more of the sky and gather more light.
- Tripod: A sturdy tripod is essential for long exposure shots, which are crucial for capturing the Aurora.
- Remote Shutter Release: This helps to prevent camera shake when taking long exposures.
Finding the Perfect Location
Location is key when photographing the Northern Lights. Here are some tips:
- Avoid Light Pollution: Find a dark, remote location away from city lights.
- Check the Forecast: Use Aurora forecast apps or websites to determine the best time and place to see the lights.
- Scout Locations: Visit potential spots during the day to plan your compositions and ensure a clear view of the northern horizon.
Camera Settings for Aurora Photography
Getting the right settings on your camera is crucial. Here’s a basic setup to start with:
- ISO: Set your ISO between 800 and 3200, depending on your camera’s low-light capability.
- Aperture: Use the widest aperture your lens allows (f/2.8 or lower).
- Shutter Speed: Start with a shutter speed of around 10-20 seconds. Adjust based on the brightness and movement of the Aurora.
- Focus: Manually set your focus to infinity. Use live view and magnify a bright star or distant light to fine-tune.
Techniques for Stunning Aurora Photos
- Long Exposures: Experiment with longer exposures to capture more detail and brighter lights, but be mindful of the Aurora’s movement to avoid blurry results.
- Foreground Interest: Include interesting foreground elements such as trees, mountains, or lakes to add depth and context to your photos.
- Composition: Follow the rule of thirds to create balanced and engaging compositions.
- Shoot in RAW: Shooting in RAW format gives you more flexibility in post-processing to enhance details and colors.
Post-Processing Tips
After capturing your shots, post-processing can help bring out the best in your Aurora photos:
- Adjust White Balance: Fine-tune the white balance to enhance the natural colors of the Aurora.
- Increase Contrast: Adjust the contrast to make the lights stand out more against the night sky.
- Noise Reduction: Apply noise reduction to minimize graininess, especially when shooting at high ISOs.
- Sharpening: Use selective sharpening to enhance the details of the Aurora without introducing noise.
Conclusion
Photographing the Aurora Borealis is a magical experience that allows you to capture the ethereal beauty of nature’s light show. With the right equipment, location, and techniques, you can create stunning images that showcase the splendor of the Northern Lights. Remember to be patient and prepared, as the Aurora can be unpredictable. Happy shooting, and may your nights be filled with vibrant, dancing lights!